In the spotlight this time are Wendy Vecchi Embossing Powders; I love these powders because they are available in such bright colours, and that makes them perfect for this 'painting' technique. Hold on to your hats people, this is as close as I get to doing CAS!!!

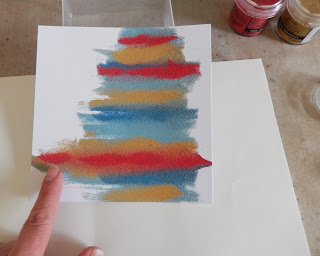
Next swipe uneven lines of FlitterGlu over a plain piece of card using the Phat Foam. Why choose FlitterGlu rather than embossing ink? It can be added exactly where you need it and, most importantly, it remains tacky permanently. That means there's no rush with the next steps.

Using a small spoon sprinkle lines of your first colour embossing powder across the areas you've added the glue to (these will become more visible as we go along). In this case I used Red Geranium, returning the excess powder to the pot by catching it on a piece of paper.

Repeat the process using two further colours (for this one I chose Cornflower Blue and Tree Branch). Finally fill in the gaps with the lightest colour (Sky Blue).

At this point you may have some straight edges or bits you want to alter so go in with your finger and gently remove any excess powder. This may mix the colours a little on the paper underneath your card but that's good. Now heat set the embossing powder with a heat gun, and here's a hint - if your background warps at this point try misting a little water on the back of the card and putting it under some heavy books for a while to flatten it.
Put the mixed powder into a container, adding extra powder from each of the chosen colours to create your own custom colour. This is a trick Wendy Vecchi does to great effect and you can even get spare empty pots to save them in. For this project I was careful only to use the amount needed for the die cut butterfly.

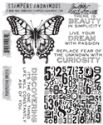
Cover the butterfly (from Tim Holtz' duo set) in FlitterGlu using the same piece of Phat Foam.

Cover the butterfly in the mixed embossing powder and again, set it with your heat gun, allowing the melted powder mix to cool completely before moving on to the next step.

Run your embossed butterfly through the coordinating embossing folder, then rub a Red Geranium Archival Ink pad over the raised areas.

Setting the butterfly aside, return to your embossed background and apply white embossing paste through a stencil over part of the design.


I enjoyed making this first card so much I made a second! This time I used Orange Blossom, Fern Green, Buttercup and Tea Rose embossing powders. The highlighting on the butterfly was done with Orange Blossom Archival Ink and the sentiment coloured with Tea Rose Archival Ink.


Start by adding FlitterGlu to with a spatula to a piece of Phat Foam (all of which comes in the FlitterGlu starter kit).

(click on any of the images for a closer look)
Next swipe uneven lines of FlitterGlu over a plain piece of card using the Phat Foam. Why choose FlitterGlu rather than embossing ink? It can be added exactly where you need it and, most importantly, it remains tacky permanently. That means there's no rush with the next steps.

Using a small spoon sprinkle lines of your first colour embossing powder across the areas you've added the glue to (these will become more visible as we go along). In this case I used Red Geranium, returning the excess powder to the pot by catching it on a piece of paper.

Repeat the process using two further colours (for this one I chose Cornflower Blue and Tree Branch). Finally fill in the gaps with the lightest colour (Sky Blue).

At this point you may have some straight edges or bits you want to alter so go in with your finger and gently remove any excess powder. This may mix the colours a little on the paper underneath your card but that's good. Now heat set the embossing powder with a heat gun, and here's a hint - if your background warps at this point try misting a little water on the back of the card and putting it under some heavy books for a while to flatten it.

Put the mixed powder into a container, adding extra powder from each of the chosen colours to create your own custom colour. This is a trick Wendy Vecchi does to great effect and you can even get spare empty pots to save them in. For this project I was careful only to use the amount needed for the die cut butterfly.

Cover the butterfly (from Tim Holtz' duo set) in FlitterGlu using the same piece of Phat Foam.

Cover the butterfly in the mixed embossing powder and again, set it with your heat gun, allowing the melted powder mix to cool completely before moving on to the next step.

Run your embossed butterfly through the coordinating embossing folder, then rub a Red Geranium Archival Ink pad over the raised areas.

Setting the butterfly aside, return to your embossed background and apply white embossing paste through a stencil over part of the design.

To finish the card I added lace, a die cut sentiment (coloured with Cornflower Blue Archival Ink) and the embossed butterfly (with added pearl embellishment).

Here are some close ups...


I enjoyed making this first card so much I made a second! This time I used Orange Blossom, Fern Green, Buttercup and Tea Rose embossing powders. The highlighting on the butterfly was done with Orange Blossom Archival Ink and the sentiment coloured with Tea Rose Archival Ink.

Here are more close ups...


Gosh, this took longer to explain that to create! I hope you've enjoyed this tutorial and feel inspired to try your hand 'painting' with your embossing powders. Personally I can't wait to have a go again with the latest colours, Tiger Lily, Pink Peony and Violet!!
Remember, these wonderful Wendy Vecchi embossing powders have an extra 15% discount applied for the next two weeks at The Funkie Junkie Boutique so it makes sense to stock up now.
For now I hope you have a wonderful weekend and, whatever you're up to, take care of yourselves.
Jenny xxx