Hello there, It's Rebecca for this week's step x step tutorial for
Frilly and Funkie. I want to show you a little party favor in the shape of a cupcake that holds some little prizes or gifts, perhaps a sweet treat...
Let's begin with the top...some would say the most important part because it holds the frosting!...
Using a 3" styrofoam ball, take a serrated knife and cut it down the middle...
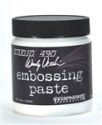
Using a spatula and light molding paste, give the dome a luscious coating...
Inserting a pin at the top, makes it easier to 'frost' the entire top. It's amazingly realistic!!!
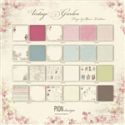
Cut a strip of 2-3/8" x 12" paper. This paper is from the Pion, 'Vintage Garden' collection...
Score the short dimension every 1/4", all the way across...
and then accordian fold it and connect one end to the other, overlapping a full fold...
To create the base, punch or die cut a 1-3/4" circle and cut a strip that is 1/2" x 6". Score the strip at the 1/4" mark, down the length of the strip and then snip from one edge to the score line, all the way down the 6" length...
Wrapping the length around the base circle, overlap and adhere the ends of the strip. The cut edge will overlap and adjust to accommodate the curve...
Glue the strip to the base circle. When it's dry, glue another punched circle inside this little tray, to cover the clipped ends...
Glue the base to one edge of the folded sleeve. I used a generous amount of quick drying paper glue...
You can see the overlap of the sleeve, just to the right of center. As the piece dries, I inserted the spare half of the styrofoam ball into the top portion, placing the curved side down. This helps to shape the base...
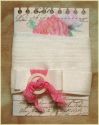
Once the modeling paste dried, I attached a triple bow of hand dyed seam binding with a short, floral straight pin. They are about half an inch long and perfect for pinning into styrofoam. The seam binding was dampened and then dyed with distress ink reinkers...
Velvety leaves were adhered under the bow and opposite each other. A paper rose was colored with a marker and glued on top of the bow. The little banner is from the Vintage Garden paper collection. It's glued to a trinket pin and the little white flower appliqué is colored with markers...
The lid lifts off to reveal whatever surprise you choose. I would prefer a color coordinated treat, but I settled for some candies in the cupboard! You can always color the moulding paste with a few drops of distress or dye ink, spray the dry paste with paints, sparkles..anything you can think of. A coating of adhesive and glitter would be spectacular too! Have fun with this technique and honestly, I think it would be pretty easy to set up a production line to produce a dozen or so...think of decorating each one differently!
Thanks for popping in and I hope you have a terrific day.
(hugs))
Rebecca


Oh this is so clever and looks delicious Rebecca. Jenny x
ReplyDeleteA really great step by step that looks gorgeous , love how you did the icing , really gorgeous idea x hugs x trace x
ReplyDeleteSuch clever use of the styrofoam ball! It really does look good enough to eat......we have a wedding come up soon so thanks for the inspiration.
ReplyDeleteFabulous make Rebecca. It certainly is good enough to eat. Hugs Rita xxx
ReplyDeleteYum, pass the cupcakes, please!
ReplyDeleteVery cute and clever idea for a party favor. And, who doesn't like cupcakes!!!
ReplyDelete