


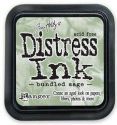
Now how's this for a challenge - I added the lighter coloured Distress Paints (Frayed Burlap and Bundled Sage) in patches directly onto the black cover. As you can see, the coverage was really good, showing just how opaque these paints are. They are also very wet, which for this was ideal as it allowed plenty of time to mist them gently with water and blend them well before they dried.


I let the paint dry 'naturally' rather than employing a heat tool as I found this way it allowed the paint to continue to react with the water and blend more. It also seems to start to develop something of a sheen if I use a heat tool, whereas leaving it to dry ensured the finish remained matte. I then added a layer of watered down matte Glue n Seal with a paint brush to protect the surface. This wouldn't be necessary normally but I know how much abuse this sketchbook is likely to face and wanted to protect the cover as much as possible initially.

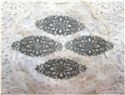
With the surface covered, I removed the masking tape and then glued on some filigree metal pieces with Glossy Accents (it's strong stuff!). If you add Stickles into some of the recesses it creates a jewel like effect as it dries flat.

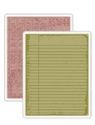
Nearly there peeps! With the cover finished attention turned to the inside covers. I dry embossed paper using a diffuser to give a flat portion to stamp on.

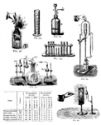
I swiped across the raised areas with some permanent sand coloured ink and then stamped chemistry images onto the centres using Watering Can Archival Ink.

Finally I blended Frayed Burlap Distress Ink around the edges and misted the pages to 'set' the ink. Once dry they were layered onto the inside covers.

If you want to see more of the finished results you can find them HERE. In the meantime I hope this has given you an insight into my experiences with Distress Paints.
Thanks so much for joining me. Have a great weekend, hugs Jenny xxx
 |  |  |  |  |  |
 |  |  |  |  |  |
 |  |  |  |  |  |
 |  |  |  |  |  |
 |  |  |

A totally stunning make Jenny and I bet your son loved it and is actually using it!
ReplyDeleteI think you know how much I love the book already (and my beloved Chemist!) but it is always good to see your step by steps, this one is excellent! Fabulous work on the book too. Hugs, Anne x
ReplyDeleteBrilliant step x step Jenny. Superb crafting on the book with your ever present incredible detailing. Nicola x
ReplyDeleteJenny the details of how you created this make are fab! It looks wonderul and I am sure will be a treasured possession! a fab step X Step xx hugs
ReplyDeleteFabulous stepxstep Jenny ! This is a real treasure for your son and I'm sure he'll love using it. Sue C x
ReplyDeleteBrilliant step by step Jenny. The finished book looks fabulous. Hugs Rita xxx
ReplyDeleteSo very well done! I love it!! TFS
ReplyDeleteWhat an amazing journal! Thank you for talking us through it,
ReplyDeleteLucy x
Fantastico!!!!!!!
ReplyDeleteCompletely superb Jenny. The effects you achieved are inspiring. One day I hope.........one day.
ReplyDeleteThank you so much for sharing the process :o) Mo x
Completely superb Jenny. The effects you achieved are inspiring. One day I hope.........one day.
ReplyDeleteThank you so much for sharing the process :o) Mo x
You make it look SO easy!! I guess I'll have to break out my embossing paste :) Thanks for sharing :)
ReplyDeleteWonderful StepXStep, Jenny! Love the process and of course the finished project! Very inspiring!
ReplyDeleteA fantastic step-by-step, Jenny, with brilliant tips along the way. I hadn't noticed that heating the paints gave a glossier finish than air-drying - will have to check that out. It's such a cool notebook... I'm not surprised it's already in use. Oh, and I think you've persuaded me of the "necessity" of the Watering Can inkpad!
ReplyDeleteAlison xx
This is fantastic! Thanks for the great step by step.
ReplyDeleteI'm impressed, I have to say. Really hardly ever do I encounter a blog that's both educative and entertaining, and let me inform you, you might have hit the nail on the head. Your thought is excellent; the difficulty is something that not sufficient individuals are speaking intelligently about. I am very comfortable that I stumbled across this in my search for something relating to this.
ReplyDeleteCccam Server | Best Cccam Server | Cardsharing Server | Best cardsharing
Amazing, loving how you made those pages using the diffuser.
ReplyDelete